Emulating Windows Snip & Sketch in Ubuntu
In my previous
post, I described the not-inconsiderable lengths I went to in order
to bring a small piece of Linux functionality to which I was
accustomed — the man program — to my Windows
computing experience, albeit as a shallow facsimile of the real thing.
This time, I’m bringing to Linux a small nicety from Windows: (an
aspect of) the Snip & Sketch
tool.1
Windows Snip & Sketch is descended from the Snipping Tool, a utility introduced in Vista which made it very easy to capture images from your screen in more nuanced ways than the traditional full-display grab afforded by the PrtSc key: you could select a single window, or draw a box or even a free-form enclosure, to capture only that and save yourself from the minor inconvenience of post-PrtSc editing. The captured area would then appear within the Snipping Tool window, permitting you to draw arrows and circles or add highlights. Having first encountered it while working as an IT helpdesk intern, it proved massively helpful for writing emails that described to users where to find the settings and features which promised to address their sundry woes.
“But Daniel,” you say, “GNOME Screenshot is a thing which exists, and has nearly all the same features, and comes bundled with Ubuntu!” And, of course, you’d be right.
However, the transition from Snipping Tool to Windows Snip & Sketch included2 a key innovation: the option, enabled via Windows settings, to invoke Snip & Sketch upon pressing PrtSc instead of the traditional behavior.3 Used in this fashion, a small toolbar appears at the top of the screen to present the selection modes, with the last-used mode (for me, nearly always rectangular selection) already engaged. Thus, a new workflow emerged:
- Press PrtSc
- Click-and-drag the mouse diagonally over part of the screen
- Click the subsequent notification to view the capture in a new window
Having transitioned by this time from helpdesk intern to software developer, my need to take screenshots for the benefit of others diminished; but the ability to capture parts of my screen immediately upon pressing PrtSc continues to come in handy on a regular basis, especially whilst debugging. I take screenshots of snippets of code, query results, UI, etc., allowing me to keep those things handy in auxiliary windows while moving on in my editor/database manager/other software.
Like most Linux software,4 GNOME Screenshot has a CLI, including flags for the capture mode.
gnome-screenshot -agoes directly to the rectangular-selection (area)
mode, and by default saves the capture to the ~/Pictures
directory as soon as I release the mouse button.
Generally speaking, though, I don’t want to save the capture, and I do want it to appear on-screen, immediately, in a convenient window. What if we save the image to a temporary file, and then open it automatically in an image viewer? Here’s a little script which does just that:
#!/bin/bash

  filename="$(mktemp --suffix=.png)" && gnome-screenshot -af "$filename" && eog "$filename"
The first part uses mktemp to generate a random filename
(ending in .png) somewhere in the
/tmp directory, and stores it in a bash variable called
$filename. Next, we invoke
gnome-screenshot as before, appending the
-f flag to instruct it to save the image to our
temporary path. Finally, eog
(Eye of GNOME,
Ubuntu’s default image viewer) displays the image.
The temporary file will eventually be cleaned up by the OS, so practically speaking it’s almost the same as not saving it in the first place. If for whatever reason I do want to keep the capture long-term, I can save it somewhere else with Eye of GNOME’s “Save As” menu option.
The final piece is the PrtSc key. This was easy to set up via the “Keyboard Shortcuts” section of Ubuntu’s Settings.
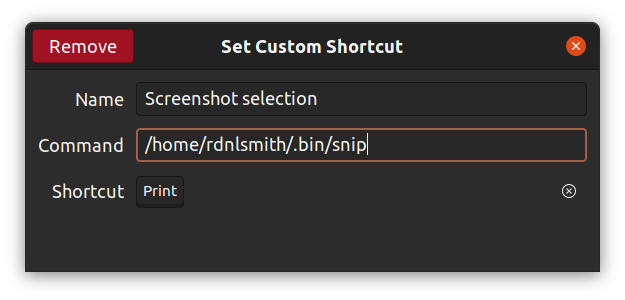
I saved my script as
~/.bin/snip5
and listed it as the command, binding it to the PrtSc
key. Don’t forget to make the script executable:
chmod +x ~/.bin/snipIf I press PrtSc and then decide not to take a
capture, I can press Esc to cancel out of GNOME Screenshot;
however, it seems this still produces a successful
0 exit code, so the && barrels
ahead and Eye of GNOME complains about being asked to display an
empty temporary file. I may update this post in the future if I ever
bother to find a solution, but in the meantime it works well enough.
If you, reader, find a solution,
email me!
Footnotes
This form of customization — taking small bits I like from one platform and applying them to others — is a pastime I quite enjoy, and I will likely write more such articles in the future. ↩︎
Well, eventually. I don’t recall the specifics, and I probably didn’t notice for a while when it did appear, but I recall it lagged a bit behind the initial introduction. ↩︎
Yes, I know about AutoHotKey. No, I probably won’t install it on my work computer. ↩︎
This claim is presented with no vetting whatsoever. ↩︎
I find it convenient to keep scripts and other side-loaded executables in a hidden
.binfolder in my home directory. I’ve added this to my$PATHin my .bashrc, so anything I put here is easily executed from my prompt. ↩︎